前言 本文参考自 51CTO博客,作者springboot葵花宝典
记录从新建项目到整合SpringSecurity-OAuth2的全部过程。
完整代码在 spring-oauth2-demo
介绍 OAuth2 Oauth2.0是目前流行的授权机制,用于授权第三方应用,获取数据。Oauth协议为用户资源的授权提供一个安全、开放并且简易的规范标准。和以往授权不同的是Oauth不会使第三方触及到用户的账号信息(用户和密码),也就是说第三方不需要使用用户的用户名和密码就可以获取到该用户的用户资源权限。
OAuth2设计的角色
资源所有者 :通常是用户(User),如昵称、头像这些资源的拥有者(用户只是将这些资源放到服务提供商的资源服务器中)。第三方应用 :或者称为第三方客户端(Clinet),希望使用资源服务器提供的资源。认证服务器(Authorization Server) :专门用于对资源所有者的身份进行认证,对要访问的资源进行授权、产生令牌的服务器。访问资源,需要通过认证服务器由资源所有者授权才可以访问。资源服务器(Resource Server) :存储用户的资源,验证令牌有效性。比如:微信资源服务器存储了微信用户信息,淘宝资源服务器存储了淘宝的用户信息。服务提供商(Service Provider) :认证服务和资源服务归属于一个机构,该机构就是服务提供商。
OAuth2认证流程 OAuth在第三方应用和服务提供商之间,设置一个授权层(authorization layer)。第三方应用不能直接登录”服务提供商”,只可以通过授权层将”第三方应用”和用户区分开来。”第三方应用”通过授权层获取令牌(accesstoken),获取令牌后拿令牌去访问服务提供商。令牌和用户密码不同,可以指定授权层令牌的权限范围和有效期,”服务提供商”根据令牌的权限范围和有效期,向”第三方应用”开放用户对应的资源。第三方客户端登录主要步骤如下:
第三方应用,向认证服务器请求授权。
用户告知认证服务器同意授权(通常是通过用户扫码或输入“服务提供商”的用户名密码的方式)
认证服务器向第三方应用告知授权码(code)
第三方应用使用授权码(code)申请Access Token
认证服务器验证授权码,颁发Access Token
OAuth2四种授权方式 OAuth2有四种授权方式分别如下
授权码模式(Authorization Code) 授权码模式(Authorization Code) :功能是最完整的,流程也是最严密的,国内各大服务提供商(微信、微博、淘宝、百度)都是使用此授权模式进行授权。该授权模式可以确定是用户进行授权的,并且令牌是认证服务器放发到第三方应用服务器,而不是浏览器上。
简化模式(Implicit) 简化模式(Implicit) :和授权码模式不同的是,令牌发放给浏览器,OAuth2客户端运行在浏览器中,通过KS脚本去申请令牌。而不是发放该第三方应用的服务器。
密码模式(resource owner password credentials) 密码模式(resource owner password credentials) :将用户和密码传过去,直接获取accesstokne,用户同意授权动作是在第三方应用上完成,而不是在认证服务器。第三方应用申请令牌时,直接带用户名和密码去向认证服务器申请令牌。这种方式认证服务器无法断定用户是否真的授权,用户和密码可能是第三方应用盗取过来的。
客户端模式(client credentials) 客户端模式(client credentials) :使用较少,当一个第三方应用自己本身需要获取资源(而不是以用户的名义),而不是获取用户资源时,客户端模式十分有用。
具体流程如下:
客户端向认证服务器进行身份认证,并要求一个访问令牌
认证服务器确认后,向客户端提供访问令牌
模块创建 Spring Security登录信息存储在Session中,每次访问服务的时候,都会查看浏览器中Cookie中是不是存在JSESSIONID,如果不存在JSESSIONID会新建一个Session,将新建的SessionID保存到Cookie中。每一次发送请求都会通过浏览器的SessionID查找到对应的Session对象。从而获取用户信息。
前后端分离后,前端部署在单独的Web服务器,后端部署在另外的应用服务器上,浏览器先访问Web服务器,Web服务器访问请求到应用服务器,这样使用Cookie存储就不合适具体原因如下:
开发复杂
安全性差
客户体验差
有些前端技术不支持Cookie,比如:小程序
解决方式:使用令牌方式进行认证解决上面所提到的问题,可以使用OAuth2协议。
基础模块创建
在spring-oauth2-demo模块的pom.xml中添加依赖
<parent > <groupId > org.springframework.boot</groupId > <artifactId > spring-boot-starter-parent</artifactId > <version > 2.2.6.RELEASE</version > </parent > <dependencies > <dependency > <groupId > org.springframework.boot</groupId > <artifactId > spring-boot-starter</artifactId > </dependency > <dependency > <groupId > org.projectlombok</groupId > <artifactId > lombok</artifactId > <optional > true</optional > </dependency > <dependency > <groupId > org.springframework.boot</groupId > <artifactId > spring-boot-starter-test</artifactId > <scope > test</scope > </dependency > <dependency > <groupId > org.springframework.boot</groupId > <artifactId > spring-boot-starter-security</artifactId > </dependency > <dependency > <groupId > org.springframework.boot</groupId > <artifactId > spring-boot-starter-web</artifactId > </dependency > <dependency > <groupId > cn.hutool</groupId > <artifactId > hutool-all</artifactId > <version > 5.5.9</version > </dependency > <dependency > <groupId > org.springframework.security.oauth</groupId > <artifactId > spring-security-oauth2</artifactId > <version > 2.3.6.RELEASE</version > </dependency > <dependency > <groupId > org.springframework.boot</groupId > <artifactId > spring-boot-starter-data-redis</artifactId > <version > 2.3.12.RELEASE</version > </dependency > <dependency > <groupId > org.springframework.boot</groupId > <artifactId > spring-boot-starter-thymeleaf</artifactId > </dependency > <dependency > <groupId > mysql</groupId > <artifactId > mysql-connector-java</artifactId > <scope > runtime</scope > </dependency > <dependency > <groupId > com.alibaba</groupId > <artifactId > druid</artifactId > <version > 1.1.12</version > </dependency > <dependency > <groupId > com.baomidou</groupId > <artifactId > mybatis-plus-boot-starter</artifactId > <version > 3.5.1</version > </dependency > <dependency > <groupId > org.springframework.security</groupId > <artifactId > spring-security-test</artifactId > <scope > test</scope > </dependency > </dependencies >
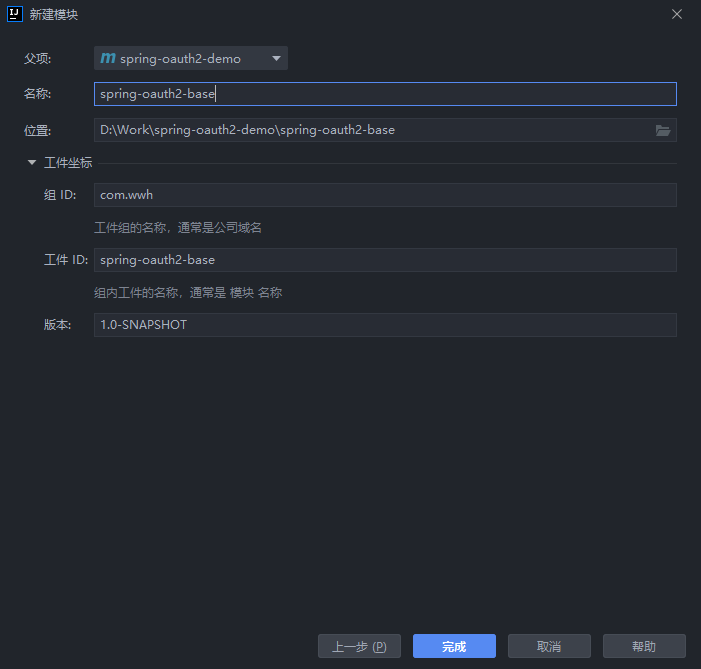
在spring-oauth2-demo父模块下创建spring-oauth2-base子模块
在spring.oauth2.base.api模块下添加IResultCode接口
public interface IResultCode { int getCode () ; String getMsg () ; }
在spring.oauth2.base.api模块下创建ResultCode枚举实现IResultCode
@Getter @AllArgsConstructor public enum ResultCode implements IResultCode { SUCCESS(200 , "操作成功" ), FAILURE(400 , "业务异常" ), ERROR(500 , "服务异常" ), GLOBAL_PARAM_ERROR(540 , "参数错误" ); final int code; final String msg; }
在spring.oauth2.base.api模块下创建Result用于统一结果处理
@Data @Getter public class Result <T> implements Serializable { private static final long serialVersionUID = 1L ; private int code; private String msg; private Date time; private T data; private Result () { this .time = new Date (); } private Result (IResultCode resultCode) { this (resultCode, null , resultCode.getMsg()); } private Result (IResultCode resultCode, String msg) { this (resultCode, null , msg); } private Result (IResultCode resultCode, T data) { this (resultCode, data, resultCode.getMsg()); } private Result (IResultCode resultCode, T data, String msg) { this (resultCode.getCode(), data, msg); } private Result (int code, T data, String msg) { this .code = code; this .data = data; this .msg = msg; this .time = new Date (); } public static <T> Result<T> success (IResultCode resultCode) { return new Result <>(resultCode); } public static <T> Result<T> success (String msg) { return new Result <>(ResultCode.SUCCESS, msg); } public static <T> Result<T> success (IResultCode resultCode, String msg) { return new Result <>(resultCode, msg); } public static <T> Result<T> data (T data) { return data(data, "处理成功" ); } public static <T> Result<T> data (T data, String msg) { return data(ResultCode.SUCCESS.code, data, msg); } public static <T> Result<T> data (int code, T data, String msg) { return new Result <>(code, data, data == null ? "承载数据为空" : msg); } public static <T> Result<T> fail () { return new Result <>(ResultCode.FAILURE, ResultCode.FAILURE.getMsg()); } public static <T> Result<T> fail (String msg) { return new Result <>(ResultCode.FAILURE, msg); } public static <T> Result<T> fail (int code, String msg) { return new Result <>(code, null , msg); } public static <T> Result<T> fail (IResultCode resultCode) { return new Result <>(resultCode); } public static <T> Result<T> fail (IResultCode resultCode, String msg) { return new Result <>(resultCode, msg); } public static <T> Result<T> condition (boolean flag) { return flag ? success("处理成功" ) : fail("处理失败" ); } }
认证服务器模块创建
在spring-oauth2-demo父模块下创建spring-oauth2-server子模块
server:
  port: 8899
spring:
  thymeleaf:
    cache: false
  application:
    name: oauth2-server
  datasource:
    driver-class-name: com.mysql.cj.jdbc.Driver
    url: jdbc:mysql://localhost:3306/oauth2-demo?useUnicode=true&serverTimezone=Asia/Shanghai&characterEncoding=utf-8&useSSL=false
    username: root
    password: 1234
认证服务器配置 授权码模式 创建配置类 创建作用:
配置允许访问此认证服务器的客户端信息,没有再次配置的客户端信息不允许访问。
管理令牌
配置令牌管理策略(JDBC/Redis/JWT)
配置令牌生成策略
配置令牌端点
令牌端点的安全配置
创建认证服务配置类 在spring-oauth2-server子模块创建认证配置类:
创建 spring.oauth2.server.config.OAuth2AuthorizationServerConfig 类继承 AuthorizationServerConfigurerAdapter
在 OAuth2AuthorizationServerConfig 类上添加注解:
@Configuration@EnableAuthorizationServer 认证服务器
配置说明:
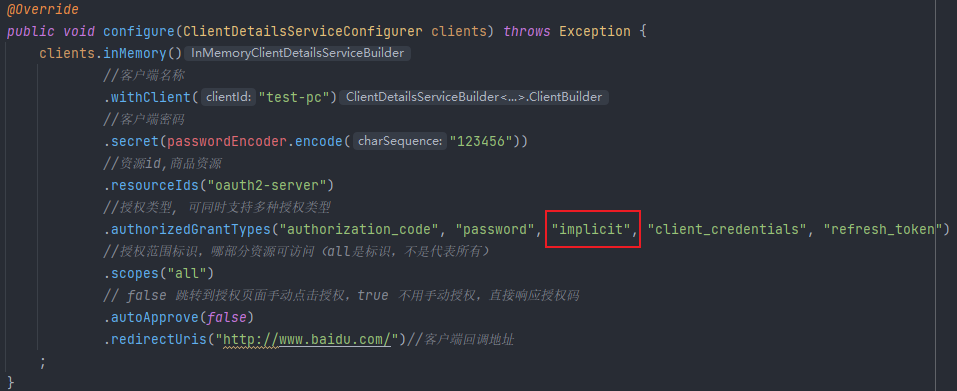
可以配置:”authorization_code”, “password”, “implicit”,”client_credentials”,”refresh_token”
scopes:授权范围标识,比如指定微服务名称,则只可以访问指定的微服务。autoApprove:false - 跳转到授权页面手动点击授权,true - 不需要手动授权,直接响应授权码。redirectUris:当获取授权码后,认证服务器会重定向到指定的这个URL,并且带着一个授权码code响应。withClient:允许访问此认证服务器的客户端ID。secret:客户端密码,加密存储。authorizedGrantTypes:授权类型,支持同时多种授权类型。
@Configuration @EnableAuthorizationServer public class OAuth2AuthorizationServerConfig extends AuthorizationServerConfigurerAdapter { @Autowired private PasswordEncoder passwordEncoder; @Override public void configure (ClientDetailsServiceConfigurer clients) throws Exception { clients.inMemory() .withClient("test-pc" ) .secret(passwordEncoder.encode("123456" )) .resourceIds("oauth2-server" ) .authorizedGrantTypes("authorization_code" , "password" , "implicit" , "client_credentials" , "refresh_token" ) .scopes("all" ) .autoApprove(false ) .redirectUris("http://www.baidu.com/" ) ; }
统一管理Bean配置类 创建 spring.oauth2.server.config.MyOAuth2Config 类,向容器中添加加密方式 BCrypt
@Configuration public class MyOAuth2Config { @Bean public PasswordEncoder passwordEncoder () { return new BCryptPasswordEncoder () ; } }
创建安全配置类
指定认证用户的用户名和密码,用户和密码是资源的所有者。这个用户名和密码和客户端id和密码是不一样的,客户端id和密码是应用系统的标识,每个应用系统对应一个客户端id和密码。
在spring-oauth2-server子模块创建认证配置类:
创建 spring.oauth2.server.config.OAuth2SecurityConfig 类继承 WebSecurityConfigurerAdapter
在 OAuth2SecurityConfig 类上添加注解
@EnableWebSecurity 注解,包含了 @Confifiguration 注解
@EnableWebSecurity public class OAuth2SecurityConfig extends WebSecurityConfigurerAdapter { @Autowired private PasswordEncoder passwordEncoder; @Override protected void configure (AuthenticationManagerBuilder auth) throws Exception { auth.inMemoryAuthentication() .withUser("admin" ) .password(passwordEncoder.encode("123456" )) .authorities("admin_role" ) ; } }
令牌访问端点 Spring Security对OAuth2提供了默认可访问端点,即URL
/oauth/authorize:申请授权码code,涉及类 AuthorizationEndpoint/oauth/token:获取令牌token,涉及类 TokenEndpoint/oauth/check_token:用于资源服务器请求端点来检查令牌是否有效,涉及类 CheckTokenEndpoint/oauth/confirm_access:用于确认授权提交,涉及类 WhitelabelApprovalEndpoint/oauth/error:授权错误信息,涉及 WhitelabelErrorEndpoint/oauth/token_key:提供公有密匙的端点,使用JWT令牌时会使用,涉及类TokenKeyEndpoint
获取请求授权码Code 涉及类 org.springframework.security.oauth2.provider.endpoint.AuthorizationEndpoint
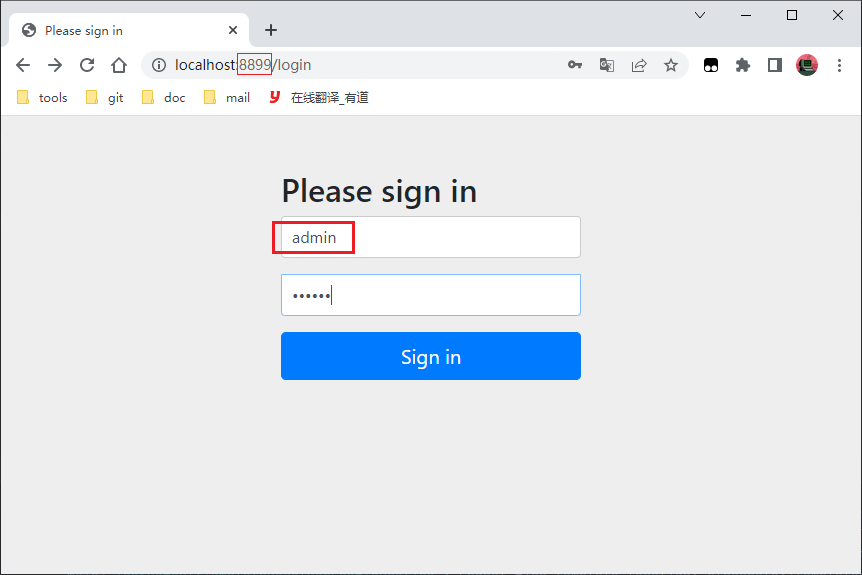
http://localhost:8899/oauth/authorize?client_id=test-pc&response_type=code
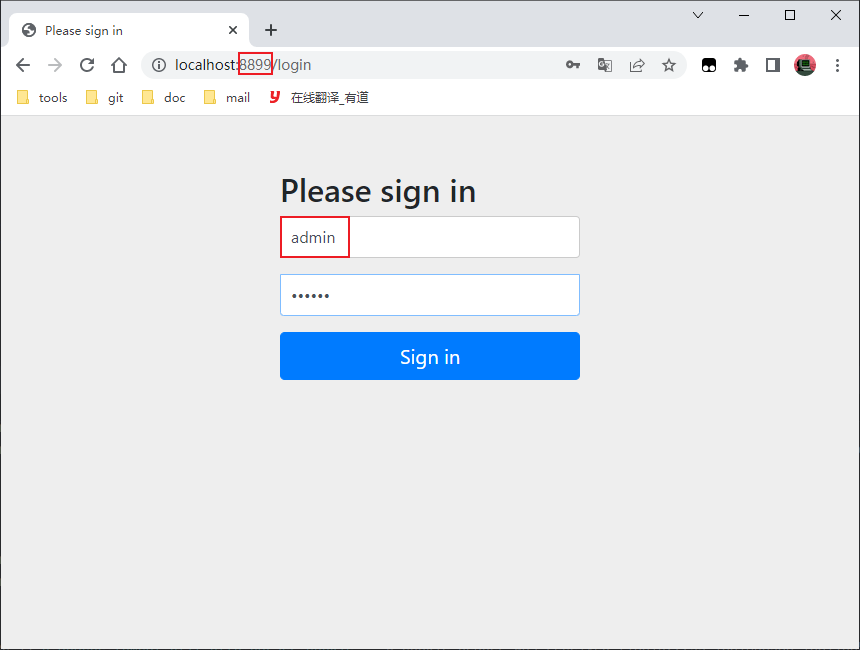
当请求到达授权中心 AuthorizationEndpoint 后,授权中心会要求资源所有者进行身份验证
注 :
此处输入的用户名、密码是在认证服务器输入的(看端口8899),而不是在客户端上输入的,这样更加安全,因为客户端不知道用户名和密码
密码模式中,输入的用户名、密码不是在认证服务器上输入,而是在客户端输入的,这样客户端就不太安全。
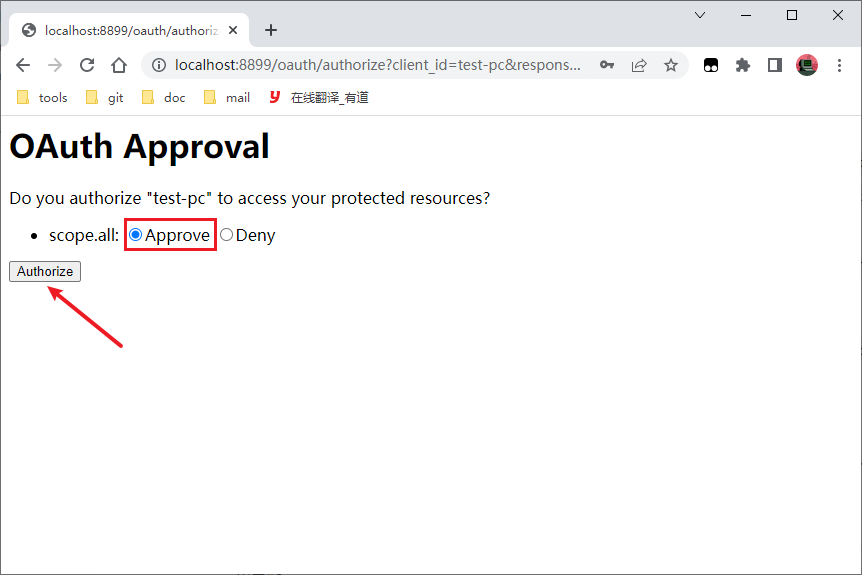
点击登录以后,会提示授权,先选择 Approve,再点击 Authorize
之后,会跳转到指定的 redirect_uri,回调路径会携带一个授权码(code=i93nYX),如下图
获取到授权码(code) 后,就可以通过它来获取访问令牌(access_token)
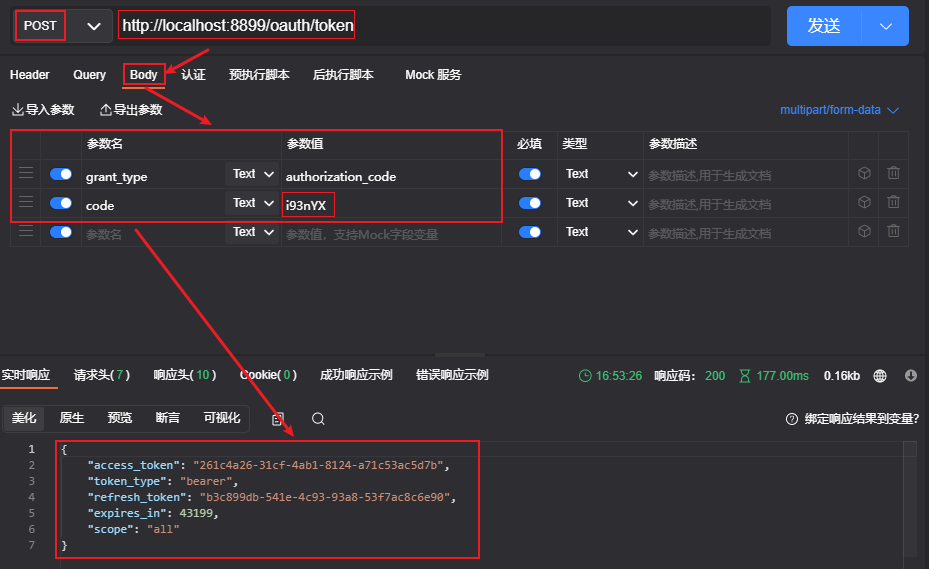
通过授权码获取令牌token 涉及:TokenEndpoint
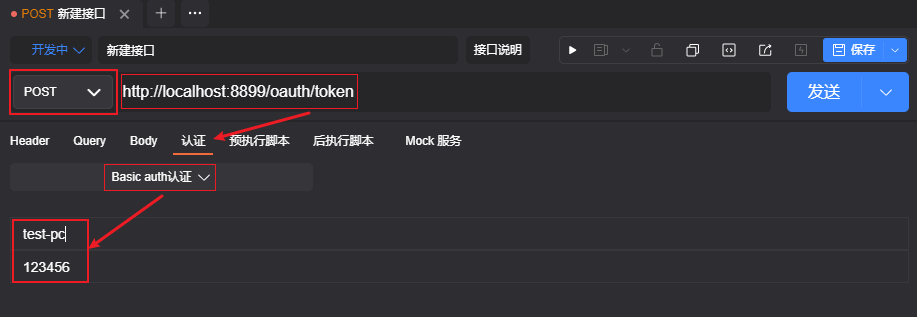
POST 方式请求:http://localhost:8899/oauth/token
ApiPost中将 client_id : client_secret 通过 Base64 编码
POST 方式,请求体中指定授权方式和授权码
每个授权码申请令牌后就会失效,需要重新发送请求获取授权码再去认证,不然就会请求认证失败
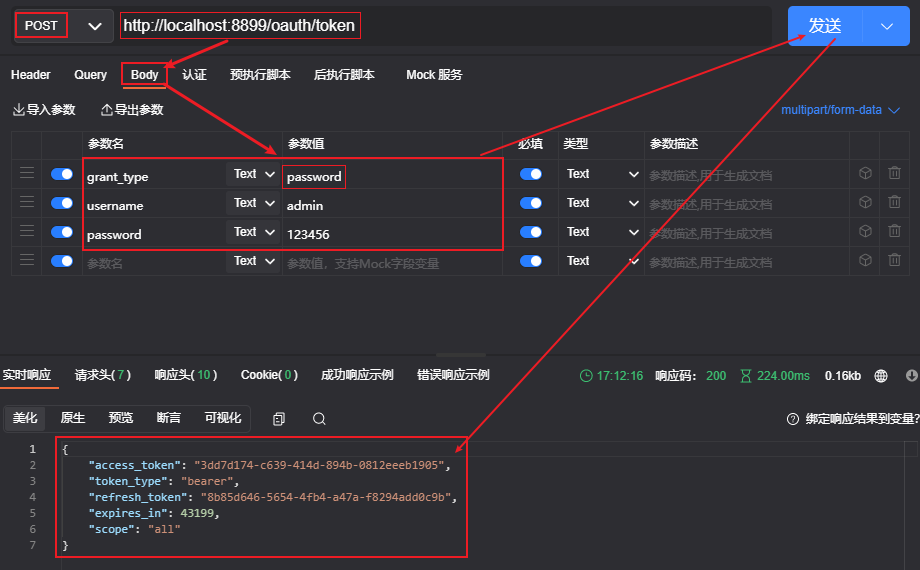
密码模式 密码模式(resource owner password credentials),用户向客户端提供自己在认证服务器上的用户和密码,然后客户端通过用户提供的用户名和密码向认证服务器获取令牌。
但是如果用户名和密码遗漏,认证服务器无法判断客户端提交的用户和密码是否是盗取的,那意味着令牌就可以随时获取,信息容易泄露。
配置密码模式 在安全配置类中 spring.oauth2.server.config.OAuth2SecurityConfig ,添加以下代码,将 AuthenticationManager 注入到 bean
@Bean @Override public AuthenticationManager authenticationManagerBean () throws Exception { return super .authenticationManagerBean(); }
指定密码模式 在认证服务器配置类 OAuth2AuthorizationServerConfig 中
覆盖父类的 configure(AuthorizationServerEndpointsConfigurer endpoints) 方法,用于配置令牌访问端点,把 authenticationManager 注入并添加
@Autowired private AuthenticationManager authenticationManager;@Override public void configure (AuthorizationServerEndpointsConfigurer endpoints) throws Exception { endpoints.authenticationManager(authenticationManager); }
针对 test-pc 客户端添加支持密码模,可以同时支持多个模式,配置如下
.authorizedGrantTypes("authorization_code" , "password" , "implicit" ,"client_credentials" ,"refresh_token" )
获取令牌token POST 方式请求:http://localhost:8899/oauth/token
ApiPost 中将 client_id:client_secret 通过 Base64 编码
请求体中指定: 授权方式 、用户名、密码
简化授权模式 不通过第三方应用程序,直接在浏览器中向认证服务器申请令牌,不需要先获取授权码。直接可以一次请求就可得到令牌,在 redirect_uri 指定的回调地址中传递令牌(access_token)。该模式适合直接运行在浏览器上的应用,不用后端支持(例如 Javascript 应用)。
简化模式 在 OAuth2AuthorizationServerConfig 类中的 configure(ClientDetailsServiceConfigurer clients) 方法中指定 implicit
获取令牌token
打开浏览器,输入访问地址
http://localhost:8899/oauth/authorize?client_id=test-pc&response_type=token
注:此时 response_typ 的参数值必须是 token
当请求到达认证服务器的 AuthorizationEndpoint 后,它会要求资源所有者做身份验证:
点击登录以后,会提示授权,先选择 Approve,再点击 Authorize
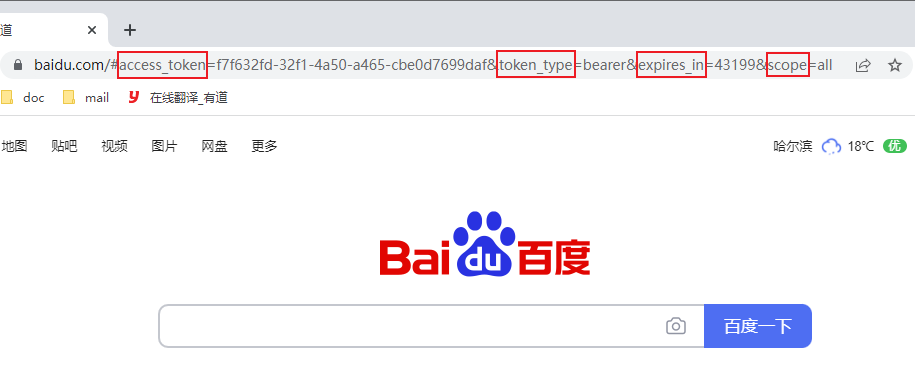
点击登录以后,会跳转到指定的 redirect_uri ,回调路径会,回调路径携带着令牌 access_token、expires_in、scope 等,如下图:
客户端授权模式 客户端模式(client credentials)是指客户端以自己名义,而不是用户名义,向认证服务器进行认证,严格说客户端模式并不属于OAuth2框架所解决的问题,在这种模式下,用户直接向客户端注册,客户端以自己的名义向认证服务器提供服务,实际上并不存在授权问题。
客户端向认证服务器进行身份认证,并要求一个访问令牌。
认证服务器确认无误后,向客户端提供访问令牌。
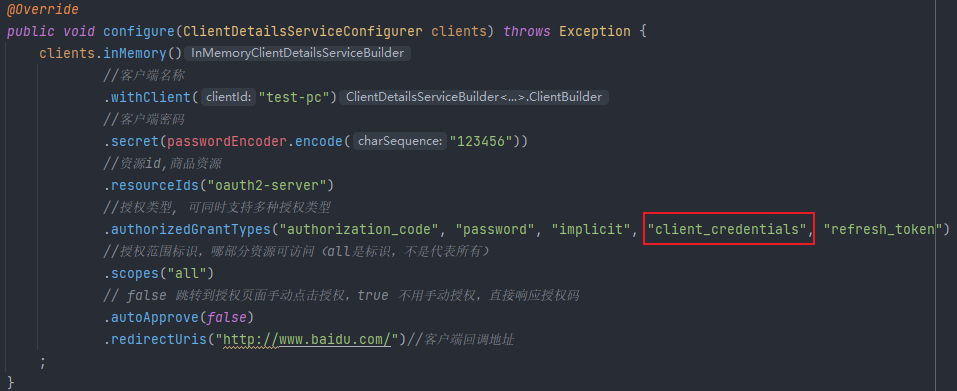
指定客户端模式 在 OAuth2AuthorizationServerConfig 类的 configure(ClientDetailsServiceConfigurer clients) 方法中指定 client_credentials
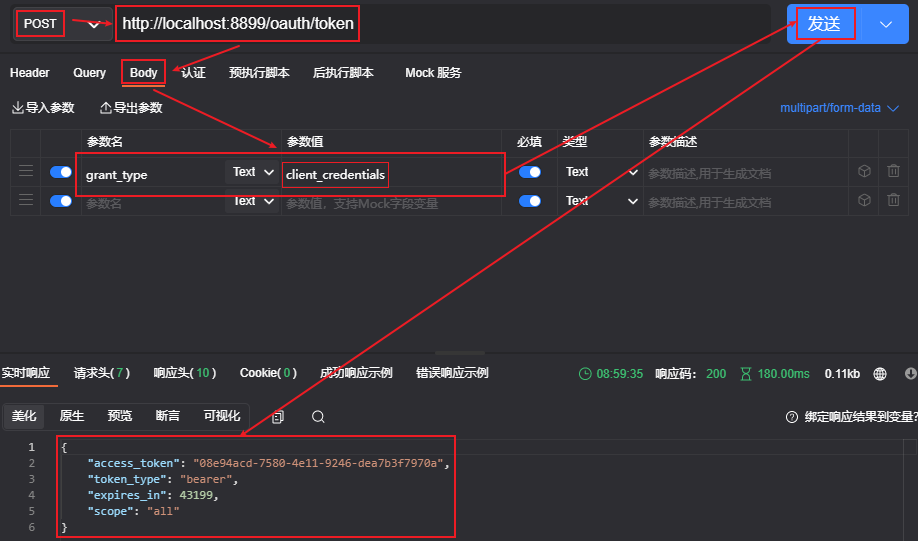
获取令牌token
ApiPost 中将 client_id:client_secret 通过 Base64 编码
Post 方式请求 ,请求体中指定授权类型 grant_type:client_credentials
令牌刷新策略 如果用户访问资源的时候,客户端的令牌已经过期,那么就需要更新令牌,申请一个新的访问令牌。
客户端发出更新令牌的Http请求,包含以下参数:
grant_type:表示使用授权模式,此处固定值为 refresh_token
refresh_token:表示早前收到的需要更新的令牌
scope:表示申请的授权范围,不可以超出上一次申请的范围。
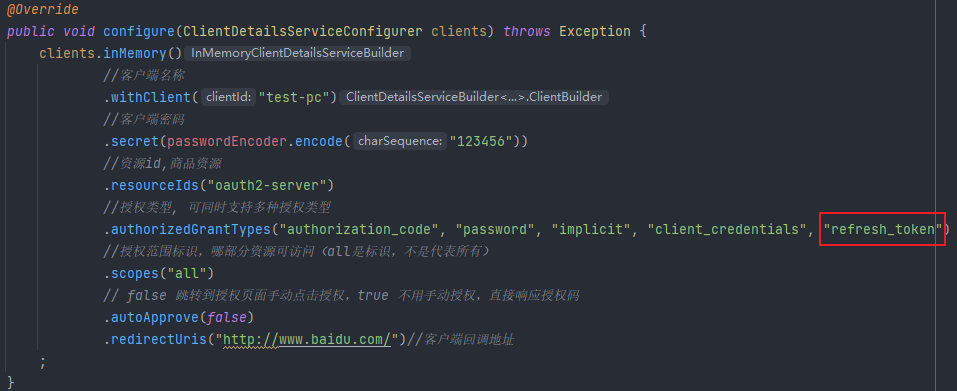
注:刷新令牌只有在授权模式和密码模式中才有,对应的指定这两种模式时,在类型上加上 refresh_token 。
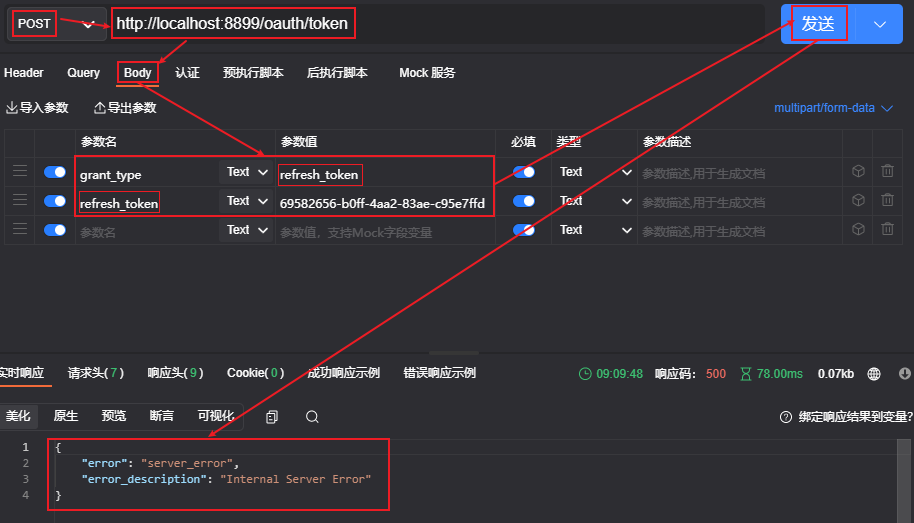
获取新令牌报错
ApiPost 中将 client_id:client_secret 通过 Base64 编码
Post 方式请求,请求体中指定:授权类型 grant_type、刷新令牌值
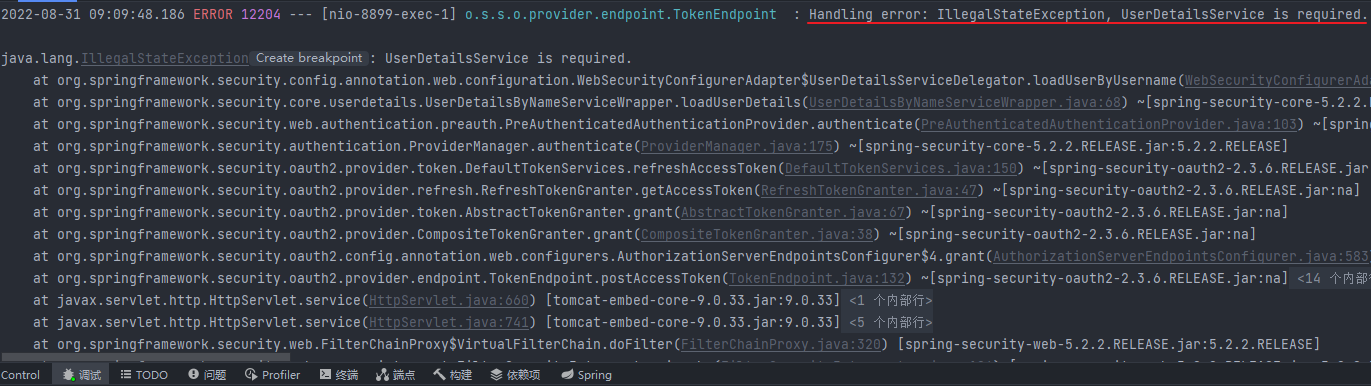
当前报错:Internal Server Error,对应idea控制台也发出警告:UserDetailsService is required.
原因是当前需要使用内存方式存储了用户令牌,应用使用UserDetailsService才行
解决办法 创建UserDetailsService实现
创建 MyUserDetailsService 动态获取用户令牌
@Component public class MyUserDetailsService implements UserDetailsService { @Autowired private PasswordEncoder passwordEncoder; @Override public UserDetails loadUserByUsername (String username) throws UsernameNotFoundException { return new User ("admin" , passwordEncoder.encode("123456" ), AuthorityUtils.commaSeparatedStringToAuthorityList("admin_role" )); } }
在安全配置类 OAuth2SecurityConfig 中注入 myUserDetailsService
@Autowired private UserDetailsService myUserDetailsService; @Override protected void configure (AuthenticationManagerBuilder auth) throws Exception { auth.userDetailsService(myUserDetailsService); }
将之前安全配置类 OAuth2SecurityConfig 中的 configure(AuthenticationManagerBuilder auth) 代码注掉
认证配置类 OAuth2AuthorizationServerConfig 的 configure(AuthorizationServerEndpointsConfigurer endpoints) 方法上加入到令牌端点上
@Autowired private UserDetailsService myUserDetailsService;@Override public void configure (AuthorizationServerEndpointsConfigurer endpoints) throws Exception { endpoints.authenticationManager(authenticationManager); endpoints.userDetailsService(myUserDetailsService); }
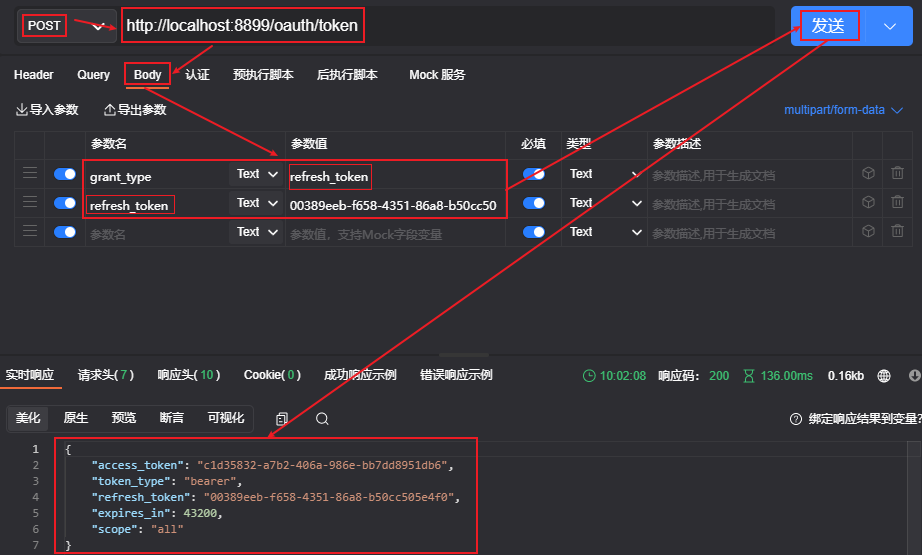
测试获取新令牌
重启认证服务器
ApiPost 中将 client_id:client_secret 通过 Base64 编码
Post 方式请求,请求体中指定:授权类型 refresh_token 、刷新令牌值
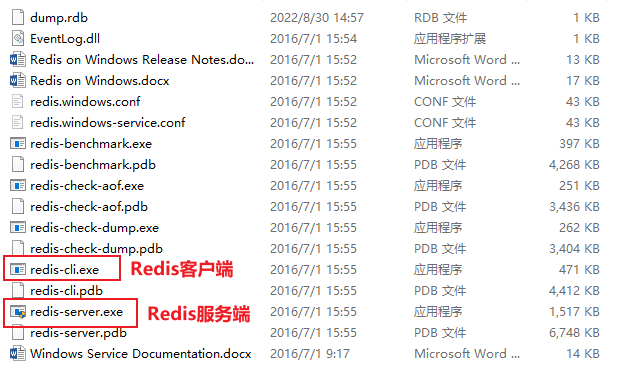
令牌管理策略Redis 启动Redis的服务器端和客户端
客户端也可以使用 RedisDesktopManager 等图形化工具查看
添加Redis的依赖
在模块 spring-oauth2-server 中添加 Redis 依赖(由于我们依赖的父级 spring-oauth2-demo 中已依赖,所以无需添加)
<dependency > <groupId > org.springframework.boot</groupId > <artifactId > spring-boot-starter-data-redis</artifactId > <version > 2.3.12.RELEASE</version > </dependency >
在 application.yml 中添加 redis 的配置
spring: redis: port: 6379 host: 127.0 .0 .1 timeout: 50000
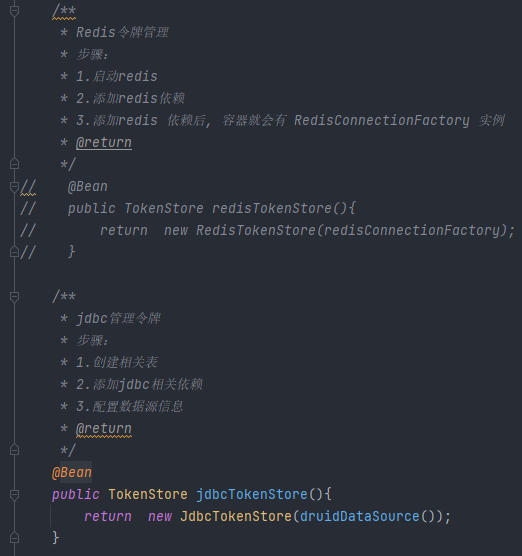
配置Redis的管理TokenStore 在 MyOAuth2Config 类中注入 RedisTokenStore
@Autowired private RedisConnectionFactory redisConnectionFactory; @Bean public TokenStore redisTokenStore () { return new RedisTokenStore (redisConnectionFactory); }
令牌管理策略添加到端点 将上面的令牌管理策略作用到认证服务器端点上,这样策略就可以生效
注入 TokenStore
在 OAuth2AuthorizationServerConfig 类的 configure(AuthorizationServerEndpointsConfigurer endpoints) 方法中将 tokenStore 添加到端点上
@Autowired private TokenStore tokenStore;@Override public void configure (AuthorizationServerEndpointsConfigurer endpoints) throws Exception { endpoints.authenticationManager(authenticationManager); endpoints.userDetailsService(myUserDetailsService); endpoints.tokenStore(tokenStore); }
测试
重启认证服务器
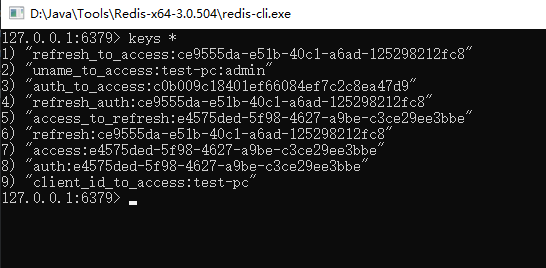
使用 flushall 命令清除所有数据,方便后面查看
使用密码模式获取令牌
keys * 查看效果如下
令牌管理策略JDBC JDBC管理令牌 创建相关数据表 Spring官方提供了存储OAuth2相关信息的数据库表结构
https://github.com/spring-projects/spring-security-oauth/blob/main/spring-security-oauth2/src/test/resources/schema.sql
当前使用Mysql数据库,需要修改以下数据类型:
官方提供的表结构主键类型VARCHAR(256),超过了Mysql的限制长度128,需要修改为VARCHAR(128)
将LONGVARBINARY类型修改为BLOB类型
修改后的表结构如下:
https://gitee.com/wwh926494/spring-oauth2-demo/blob/master/oauth2-demo.sql
-- used in tests that use HSQL
create table oauth_client_details (
  client_id VARCHAR(128) PRIMARY KEY,
  resource_ids VARCHAR(256),
  client_secret VARCHAR(256),
  scope VARCHAR(256),
  authorized_grant_types VARCHAR(256),
  web_server_redirect_uri VARCHAR(256),
  authorities VARCHAR(256),
  access_token_validity INTEGER,
  refresh_token_validity INTEGER,
  additional_information VARCHAR(4096),
  autoapprove VARCHAR(256)
);
INSERT INTO `oauth_client_details` VALUES ('test-pc', 'oauth2-server,oauth2-resource', '$2a$10$Q2Dv45wFHgxQkFRaVNAzeOJorpTH2DwHb975VeHET30QsqwuoQOAe', 'all,Base_API', 'authorization_code,password,implicit,client_credentials,refresh_token', 'http://www.baidu.com/', NULL, 50000, NULL, NULL, 'false');

create table oauth_client_token (
  token_id VARCHAR(256),
  token BLOB,
  authentication_id VARCHAR(256) PRIMARY KEY,
  user_name VARCHAR(256),
  client_id VARCHAR(256)
);

create table oauth_access_token (
  token_id VARCHAR(256),
  token BLOB,
  authentication_id VARCHAR(256) PRIMARY KEY,
  user_name VARCHAR(256),
  client_id VARCHAR(256),
  authentication BLOB,
  refresh_token VARCHAR(256)
);

create table oauth_refresh_token (
  token_id VARCHAR(256),
  token BLOB,
  authentication BLOB
);

create table oauth_code (
  code VARCHAR(256),
  authentication BLOB
);

create table oauth_approvals (
 userId VARCHAR(256),
 clientId VARCHAR(256),
 scope VARCHAR(256),
 status VARCHAR(10),
 expiresAt TIMESTAMP,
 lastModifiedAt TIMESTAMP
);


-- customized oauth_client_details table
create table ClientDetails (
  appId VARCHAR(256) PRIMARY KEY,
  resourceIds VARCHAR(256),
  appSecret VARCHAR(256),
  scope VARCHAR(256),
  grantTypes VARCHAR(256),
  redirectUrl VARCHAR(256),
  authorities VARCHAR(256),
  access_token_validity INTEGER,
  refresh_token_validity INTEGER,
  additionalInformation VARCHAR(4096),
  autoApproveScopes VARCHAR(256)
);
添加JDBC相关依赖 其中有 mybatis-plus 因为后面要用,所以一起添加进来(由于我们依赖的父级 spring-oauth2-demo 中已依赖,所以无需添加)
<dependency > <groupId > mysql</groupId > <artifactId > mysql-connector-java</artifactId > <scope > runtime</scope > </dependency > <dependency > <groupId > com.alibaba</groupId > <artifactId > druid</artifactId > <version > 1.1.12</version > </dependency > <dependency > <groupId > com.baomidou</groupId > <artifactId > mybatis-plus-boot-starter</artifactId > <version > 3.5.1</version > </dependency >
配置数据源信息 在 spring-oauth2-server 模块的 application.yml 中添加数据源
spring:
  datasource:
    driver-class-name: com.mysql.cj.jdbc.Driver
    url: jdbc:mysql://localhost:3306/oauth2-demo?useUnicode=true&serverTimezone=Asia/Shanghai&characterEncoding=utf-8&useSSL=false
    username: root
    password: 1234
    type: com.alibaba.druid.pool.DruidDataSource
配置JDBC的管理JdbcTokenStore
在 MyOAuth2Config 将 DruidDataSource 数据源注入
@Bean @ConfigurationProperties(prefix = "spring.datasource") public DataSource druidDataSource () { return new DruidDataSource (); }
在 MyOAuth2Config 指定 JDBC 管理 JdbcTokenStore
@Bean public TokenStore jdbcTokenStore () { return new JdbcTokenStore (druidDataSource()); }
测试
重启认证服务器
使用密码模式进行授权操作,然后查询 oauth_access_token 表就存储了令牌信息
JDBC管理授权码 授权码主要是操作 oauth_code 表,只有当 grant_type 是 authorization_code(授权码模式) 时,该表中才会有数据产生,其他模式下 oauth_code 表不会生成数据。
授权码切换成JDBC
在 MyOAuth2Config 类中注入 AuthorizationCodeServices
@Bean public AuthorizationCodeServices jdbcAuthorizationCodeServices () { return new JdbcAuthorizationCodeServices (druidDataSource()); }
在认证服务器配置类 OAuth2AuthorizationServerConfig 中的 configure(AuthorizationServerEndpointsConfigurer endpoints) 方法中将授权码添加到端点上
@Autowired private AuthorizationCodeServices jdbcAuthorizationCodeServices;@Override public void configure (AuthorizationServerEndpointsConfigurer endpoints) throws Exception { endpoints.authenticationManager(authenticationManager); endpoints.userDetailsService(myUserDetailsService); endpoints.tokenStore(tokenStore); endpoints.authorizationCodeServices(jdbcAuthorizationCodeServices); }
测试
http://localhost:8899/oauth/authorize?client_id=test-pc&response_type=code
JDBC存储客户端信息 查看客户端表 oauth_client_details 中的字段信息详解:
client_id:表示客户端IDresource_ids:可以访问资源服务器的ID,不写则不需要校验client_secret:客户端密码,此处不能是明文,需要加密 scope:客户端授权范围,指定默认不需要校验authorized_grant_types:客户端授权类型,支持多个使用逗号分隔
authorization_code, password, implicit, client_credentials, refresh_token
web_server_redirect_uri:服务器的回调地址autoapprove:false 表示需要手动授权,true 表示不需要自动授权
注 :需要使用 BCryptPasswordEncoder 为 client_secret 对客户端密码进行加密
在 MyOAuth2Config 类中注入 ClientDetailsService
使用JDBC方式管理客户端信息 @Bean public ClientDetailsService jdbcClientDetailsService () { return new JdbcClientDetailsService (druidDataSource()); }
在认证服务器配置类 OAuth2AuthorizationServerConfig 的 confifigure(ClientDetailsServiceConfifigurer) 切换成 JDBC 方式管理客户端信息
@Autowired private ClientDetailsService jdbcClientDetailsService;@Override public void configure (ClientDetailsServiceConfigurer clients) throws Exception { clients.withClientDetails(jdbcClientDetailsService); }
测试
重启认证服务器
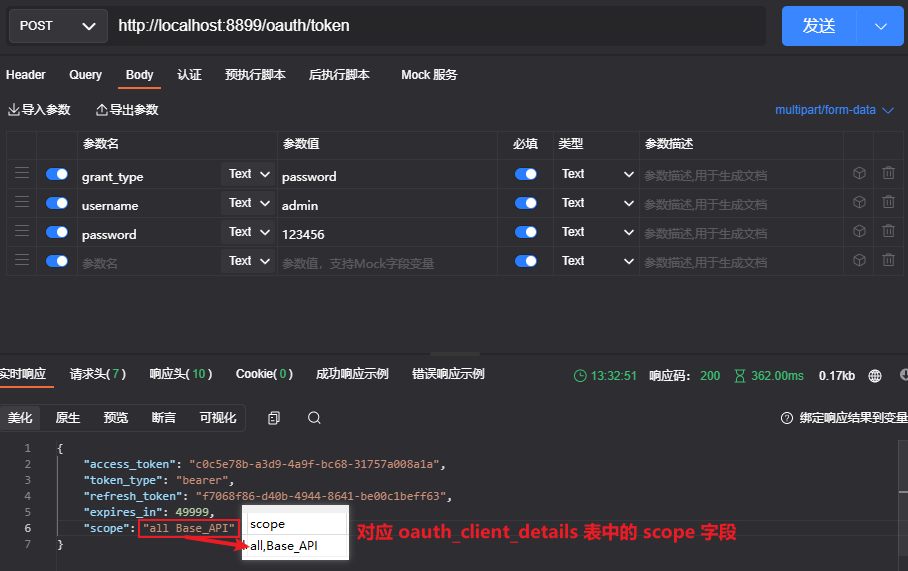
使用 admin 用户获取令牌看是否正常, 可以把数据库中 scope 值更改下,看是不是响应修改后的
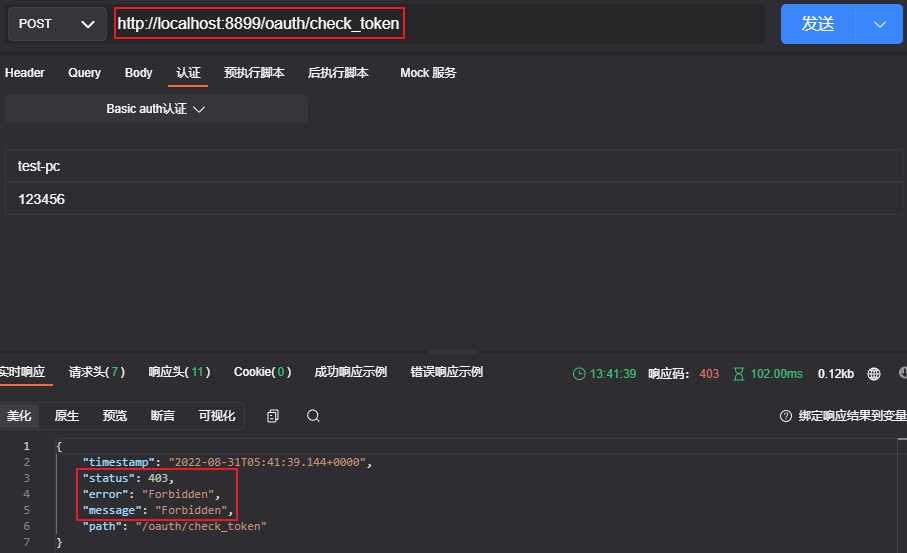
令牌端点的安全策略 端点403不允许访问
令牌访问端点
Spring Security对OAuth2提供了默认可访问端点,即URL
/oauth/authorize:申请授权码code,涉及类 AuthorizationEndpoint/oauth/token:获取令牌token,涉及类 TokenEndpoint/oauth/check_token:用于资源服务器请求端点来检查令牌是否有效,涉及类 CheckTokenEndpoint/oauth/confirm_access:用于确认授权提交,涉及类 WhitelabelApprovalEndpoint/oauth/error:授权错误信息,涉及 WhitelabelErrorEndpoint/oauth/token_key:提供公有密匙的端点,使用JWT令牌时会使用,涉及类 TokenKeyEndpoint
默认情况下 /oauth/check_token 和 /oauth/token_key 端点默认是 denyAll() 拒绝访问的权限 ,如果这两个端点需要访问,要对他们进行认证和授权,才可以访问请求头还是需要设置 client_id:client_secret Base64 编码
配置端点权限 指定 isAuthenticated() 认证后可以访问 /oauth/check_token 端点,指定 permitAll() 所有人可访问 /oauth/token_key 端点,后面要获取公钥。在 OAuth2AuthorizationServerConfig 类中覆盖 configure(AuthorizationServerSecurityConfigurer security) 方法如下:
@Override public void configure (AuthorizationServerSecurityConfigurer security) throws Exception { security.tokenKeyAccess("permitAll()" ); security.checkTokenAccess("isAuthenticated()" ); }
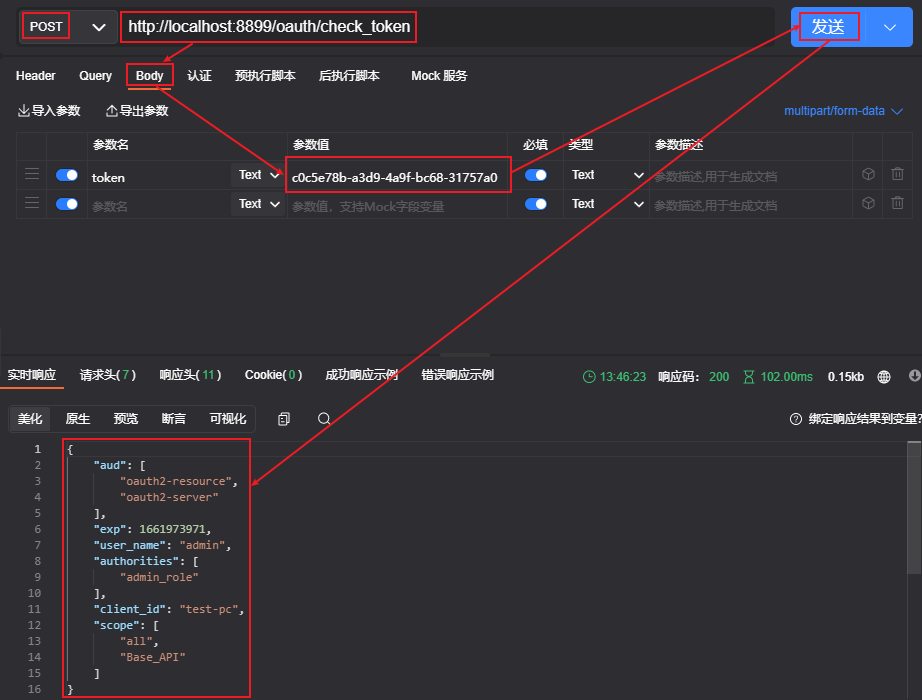
测试检查令牌端点
重启项目
通过密码方式获取令牌
检查令牌对应的用户信息
实现资源服务器 实现资源服务器的有两种方式:
认证服务器和资源服务器定义在一个SpringBoot中
认证资源服务器分离
认证服务器和资源服务器定义在一个SpringBoot中
配置资源服务器,对任何 “ /api/** “ 接口的访问,都必须经过 OAuth2 认证服务器认证。
@Configuration @EnableResourceServer public class OAuth2ResourceServer extends ResourceServerConfigurerAdapter { @Override public void configure (HttpSecurity http) throws Exception { http.authorizeRequests() .anyRequest().authenticated() .and() .requestMatchers() .antMatchers("/api/**" ); } }
随便写一个业务Api接口,代表该应用对外提供的服务资源。
@RestController @RequestMapping("/api") public class HelloController { @RequestMapping("/hello/{name}") public String hello (@PathVariable("name") String name) { return "Hello Oauth2 :" + name; } }
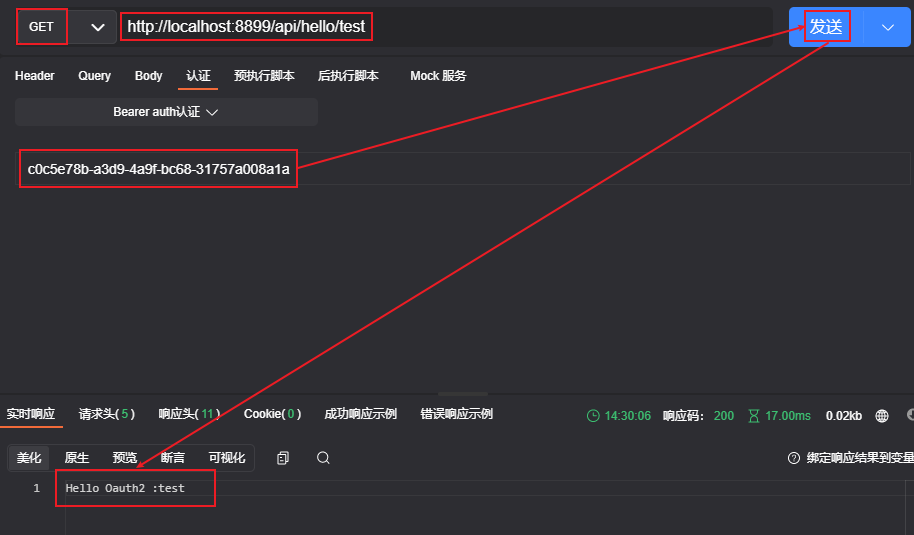
使用 AccessToken 访问资源(Get请求)
http://localhost:8899/api/hello/test
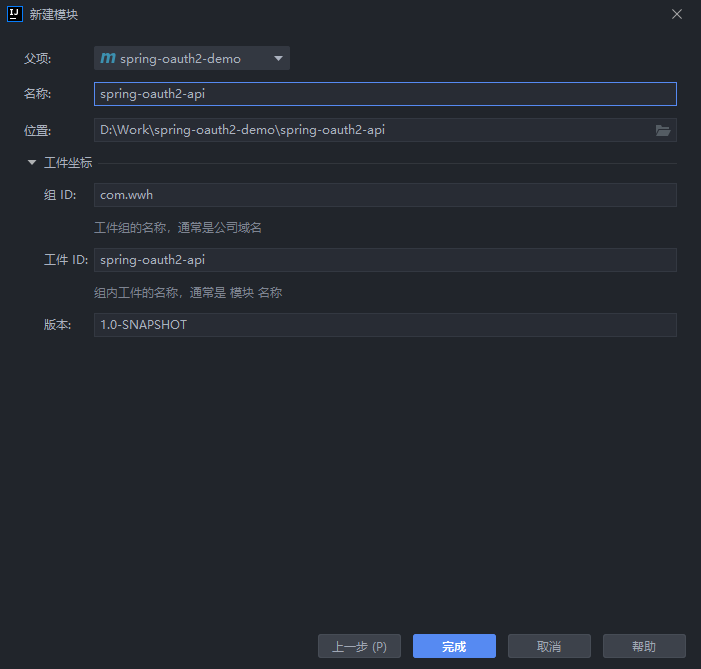
认证资源服务器分离 在spring-oauth2-demo父模块下创建spring-oauth2-api模块
创建测试API @RestController @RequestMapping("/test") public class HelloController { @RequestMapping("/hello/{name}") public String hello (@PathVariable("name") String name) { return "Hello spring-oauth2-api :" + name; } }
配置资源服务器
创建资源服务器配置类OAuth2ResourceServer类继承ResourceServerConfigurerAdapter
在类上添加注解
@Configuration@EnableResourceServer :标识资源服务器,所有发往当前服务的请求,都会去请求头里找token,找不到或 验证不通过不允许访问@EnableGlobalMethodSecurity(prePostEnabled = true):开启方法级权限控制
重写资源服务器相关配置方法 configure(ResourceServerSecurityConfigurer resources)
配置当前资源服务器ID
添加校验令牌服务
创建 RemoteTokenServices 远程校验令牌服务,去校验令牌有效性,因为当前认证和资源服务器不是在同一工程中,所以要通过远程调用认证服务器校验令牌是否有效
如果认证和资源服务器在同一工程中,可以使用 DefaultTokenServices 配置校验令牌。
@Configuration @EnableResourceServer @EnableGlobalMethodSecurity(prePostEnabled = true) public class OAuth2ResourceServer extends ResourceServerConfigurerAdapter { @Resource private DataSource dataSource; @Bean public TokenStore tokenStore () { return new JdbcTokenStore (dataSource); } @Override public void configure (HttpSecurity http) throws Exception { http.authorizeRequests() .anyRequest().authenticated() .and() .requestMatchers() .antMatchers("/test/**" ) ; } @Override public void configure (ResourceServerSecurityConfigurer resources) throws Exception { resources.resourceId("oauth2-resource" ) .tokenServices(tokenServices()); } @Primary @Bean public RemoteTokenServices tokenServices () { final RemoteTokenServices tokenService = new RemoteTokenServices (); tokenService.setCheckTokenEndpointUrl("http://localhost:8899/oauth/check_token" ); tokenService.setClientId("test-pc" ); tokenService.setClientSecret("123456" ); return tokenService; } }
注 :这里需要在启动之前添加 application.yml
需要注意因为要和 spring-oauth2-server 同时启动,需要把端口号改成不一样的
server: port: 8898 spring: thymeleaf: cache: false application: name: oauth2-resourceApi datasource: driver-class-name: com.mysql.cj.jdbc.Driver url: jdbc:mysql://localhost:3306/oauth2-demo?useUnicode=true&serverTimezone=Asia/Shanghai&characterEncoding=utf-8&useSSL=false username: root password: 1234 type: com.alibaba.druid.pool.DruidDataSource redis: port: 6379 host: 127.0 .0 .1 timeout: 50000
测试
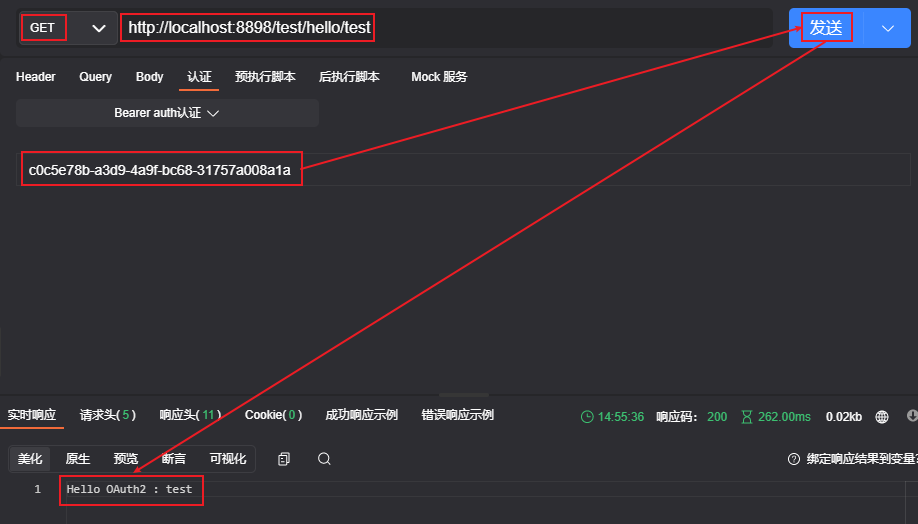
启动认证服务器(spring-oauth2-server)和资源服务器(spring-oauth2-api)
通过密码方式获取令牌
请求头带上令牌请求 /test/hello 资源
http://localhost:8899/api/hello/test